

Preparing For Long-arm Machine Quilting
QUILT TOP
- Give a final pressing from the front to the whole top just before sending it for quilting to be sure no pleats or tucks are pressed in.
- Secure all seams, especially along the edges.
- Remove all loose threads from the back and front of the quilt. (Darker frayed strands of your fabric or thread tails left on the quilt may show through lighter fabrics when the stitching compresses the layers together.)
- Mark the *TOP of your quilt by pinning a slip of paper labeled “TOP” on that part of your quilt. *The part that will be at the head of the bed or top of a wall hanging.
- Carefully Fold each layer of the top and back separately to minimize wrinkling after pressing. You may place on a plastic hanger until delivered or shipped. (Do not send / bring hangers, just fold neatly.) Click here for shipping instructions.
QUILT BACKING
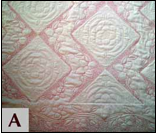
- Print or Solid? To showcase stitching on the back choose a solid fabric and then, in effect, your quilt is “reversible” as in Photo A
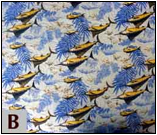
Another common preference is to use a print which hides stitching and any “tie-off knots” as in Photo B. - 100% cotton is generally preferred, or fabric which has the same fiber content as the top so all will wear evenly. Some quilters like other types of backing fabrics. We have used fleece, Minkee and other *stretchy fabrics with success; however, use of stretchy fabrics may increase the chances of tucks or puckering on the back during quilting. *(Please refer to our Quilting Tips Page – “Quilt Backs” before piecing a back constructed of Minkee or other stretchy fabrics.)
- *BACK: Cut your backing and batting at least 4” wider and longer than your quilt top on EACH SIDE. Bigger is OK but it should not be smaller.
Strips of muslin or scraps can be basted to the sides to enlarge backing if needed. (8” total. Example – 60” x 80” quilt top needs a back and batting that is 68” x 88.”) - IF you preshrink your fabric, measure size after it has been pressed.
- Remove all selvages, especially if they are pulling tight.
- IF PIECING - Use ½ inch seam allowances, for stability.
- Press backing. Press seam to one side for *cotton fabrics; Press open for bulky fabrics like Minkee. *To be sure no pleats or tucks are pressed in at seams, press from the right side.
- Square backing AND batting.
- Double check, after squaring, that the backing and batting is indeed large enough by laying them side by side with the top.
- Mark the “TOP” of both the *backing and the front of the quilt so the backing will be oriented the way you wish in relation to the “TOP / front” of the quilt. *Place on the surface of the back that should be viewable when quilt is completed.
- Fold each separate layer carefully to minimize wrinkling.
BATTING
We prefer to use quality batting such as Quilter’s Dream or Hobbs however, you are welcome to provide your own batting as long as it is specifically labeled as “suitable for machine quilting.” Please check with us first if you have some other type of batting in mind.Why pay to ship your batting? Buy only what you need! Purchase batting by the linear inch from us.
- We stock the following batting:
- Quilters Dream 100% Cotton Request (low loft) Natural, White (Lowloft currently out of stock)
- Quilters Dream 100% Cotton Select (mid loft) Natural, White
- Quilters Dream 100% Wool (warm and releases fold lines easily.)
- Quilters Dream 100% Polyester - Select (mid loft) White, Black
- Hobbs PolyDown (100% polyester with fluffy loft)
- We can purchase other batting as needed such as silk, special blends or other brands if you have a specific preference
HELP – MY QUILT TOP IS NOT PERFECT
We have quilted some ”less than perfect” tops and were very pleased at how much the stitching enhanced the final product. Is is especially fun help finish a beginning quilter's very first quilt. The picture below shows one quilt which had too much fullness in the borders and the corners were not square.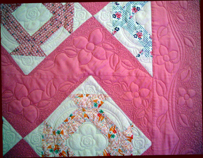
However, careful construction of your quilt top from the beginning is recommended to help it lie flat. While quilting can enhance an “imperfect” top and even look beautiful when finished, yet only so much fullness in the top or waviness in a border can be “quilted in.” Even then there is no guarantee that there won’t be puckers unless the top is flat, so you may want to consider these construction tips when starting your next project.
For a really fun video and about imperfect quilts click here. "You Can Quilt That out" by Cathy Miller, the "Singing Quilter."
