

Quilt Backs
- Print or Solid? There are least two schools of thought about backing fabrics. One preference is to choose a fabric that will showcase the stitching on the back and then in effect your quilt is reversible as in Figure 1 where the quilt is stitched with white in the blocks and pink in the sashing and borders. If you want stitching to show on the back for a reversible quilt, think about thread colors that will work well on both front and back.

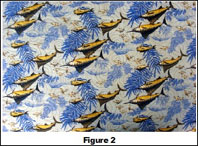
Another common preference is to use a print which hides stitching and any tie-off knots as in Figure 2. (Click on photos or illustrations to enlarge.) - Pieced - Makes a reversible quilt and / or uses up left-over fabric. Figure 3 shows the back & Figure 4 shows the front of the same quilt.
NOTE: 1. It is wise to put large borders at the edge of the back so that it will be less obvious when the top is not perfectly centered in relation to the back. This is likely to happen because of the way the back can stretch between the rollers 2. The back must be at least 3" bigger than the top on EACH side so plan accordingly if piecing the back. - Fabric Content: 100% cotton is often preferred. Fabric which has the same fiber content as the top is recommended so all fabrics wear evenly. Some quilters prefer other types of backing fabrics. We have quilted backs made of Flannel, velvet, velour, fleece, Minkee and other *stretchy fabrics with success; however, using stretchy fabrics may increase the chances of tucks or puckering during quilting. *(Please see Using Stretchy Fabrics for a Quilt Back below before piecing a back constructed of Minkee or other stretchy fabrics.)
)
)
)
)
Wide Quilt Backs - no piecing required :)
Ma's Got a NotionAt Mas, we got your back quilt back, that is!
Ma's has a wide selection of quilt backs AND, When you purchase widebackings from Mas, they are squared when you receive them. We tear our backings on the straight of the grain, and they arrive at your door ready to be pinned to the Longarm leaders.
https://www.masgotanotion.com/shop/
Constructing your quilt back:
- Calculate the size needed for the quilt back.
NOTES:
1. Backing and batting must be at least 6" wider and longer than your quilt top or 3 larger on each side. Example 60 x 80 quilt top needs a back and batting that is 66 x 86. Larger is OK but that is the minimum. If the back needs to be trimmed square, allow even more.
2. If the back is large enough for the top but does not have the extra 3" on each side, you can baste on strips of muslin or scraps to make it big enough or you can pay us to do it. - Choose which way you will piece the back if seaming is required to make the back large enough.
- SEAMING OPTIONS:
- No seams - Single piece of fabric (Use extra wide widths such as 90, 108 or 120 if needed)
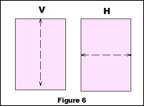
- Single center seam This seam can run either horizontally across the width of the quilt or vertically, parallel to the length of the quilt (see Fig. 6).
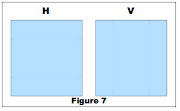
- Single width of fabric for the center section with remainder evenly spaced on either side. Again, these seams can be oriented either horizontally across the width of the quilt or vertically, parallel to the length of the quilt based on personal preference or the best use of fabric. Example: If your quilt back needs to be 80 wide, use the 42 width of fabric in the center and put a piece 19 on either side to equal the total width needed. NOTE: these measurements do not take into account the seam allowances (see Fig. 7).
- Press fabric as needed before cutting and piecing the back.
- Remove ALL selvages from your backing. (Selvages are often woven tighter than rest of the fabric and, if not removed, can lead to sewn-in tucks or puckers caused by extra fullness in the center.)
- Use ¼ inch seam allowances for 100% cotton quilt fabric and press seams to one side to prevent stress on the seam and migration of fibers through the seam.
- Use ½ inch seam allowances for thicker fabrics, such as fleece or minkee, and press the seam open to distribute the thickness over a larger area.
- Press seams according to type or weight of fabric. (See above)
- Square backing AND batting. Both should have 90 degree corners.
- Double check, after squaring, that the backing and batting is indeed large enough by laying them side by side with the top. (We sometimes receive backs that are too small due to shrinkage or human error in measuring and cutting, thus delaying the job.)
- Press backing again if needed. (To be sure no pleats or tucks are pressed in at seams, press from the right side.*)
- Mark the TOP of the backing on the right side* so any seam(s) on the back or directional backing will be oriented the way you wish in relation to the TOP of the quilt.
- Fold backing carefully to minimize wrinkling and place with the top. (Each layer should be folded separately.)
)
NOTE: To center a seam, it must be placed perpendicular to the rollers when mounted on the machine. These are Vertical seams. See Figure 5. Only Vertical seams can be centered.
We do our best to center horizontal seams between the top and bottom of the quilt but they are likely to be off at least some because the fabric stretches between the rollers.
)
)
Using Stretchy Fabrics for a Quilt Back:
NOTE: When stretchy fabrics are used for the back of a quilt, the selvage edge of the fabric must be mounted perpendicular to the rollers so that the stretchy properties of the fabric cause the least amount of problems. (See figure 5 above.)
- Cutting fabric with long knap:
- TIP: To avoid fuzzies everywhere when cutting minkee or other "long-haired" fabric, place a piece of blue painter's tape over the line to be cut. Make your cut through the fabric and tape. When finished peel away the tape and the loose fabric fuzzies should stick to it instread of flying all over your work area! Yeah!!
- Calculate the size needed for the quilt back.
- Backing and batting must be at least 6" wider and longer than your quilt top (3 larger on each side. Example 60 x 80 quilt top needs a back and batting that is 66 x 86. It can be bigger but should note be smaller.)
- Does the top require backing larger than a single width of fabric? For example, if your quilt top measures 58 x 80 the back needs to be at least 64 x 86. This is larger in both directions than a single width of most stretchy fabrics. The majority of stretchy type fabrics are 58 61 wide) so the back will need to be pieced, or, you can find some extra wide minkee fabric that is great for bigger quilt backs.
- Determine how the quilt top will be oriented on the machine when it is stitched out.
- Is your pattern directional or non-directional? If both your quilt top and the design(s) to be stitched are directional (only look good one way) then the quilt must be mounted so that the design will not look sideways as it is stitching out on the top. It must read left to right. (See figure 8 for examples of directional and non-directional quilt designs.)
- Does your top have straight strips or borders much longer on one side than the other? It is best to mount the quilt with the longest borders or straight strips parallel to the bars so they can be quilted all the way across in a single pass which requires only one tie-off per row. (See figure 9)
- Plan seams of backing so that the back can be mounted on the quilting machine with the selvage (least stretchy or finished edge) perpendicular to the rollers. (See figure 5 again.)
)
)
NOTE: If the quilt backing has a nap or pile, such as velour or corduroy, the orientation of the nap in relation to the quilt top will be determined by the direction of the top when it is mounted on the frame. For example, if the quilt top has long straight strips or borders you may want to orient the longest side of the top parallel with the bars so the strips or borders can be stitched in a single pass. If the quilt is longer than 52 it will require a back bigger than just one single width of fabric which means the back must be pieced and the nap will run across the width or narrower side of the quilt when finished. (See Figure 10)
)
- Press the backing fabric if needed before cutting. (Often stretchy fabrics like Minkee, fleece or velour will not require pressing.)
- Cut pieces for back, allowing ½ for each seam allowance. (ONLY trim off selvages of stretchy fabrics if they are tighter than the body of the fabric.)
- Seam using a ½ seam allowance.
- Press Seams open. The rest of the back usually will not require pressing when using a stretchy fabric.
- Fold Neatly.
